

Table of contents
- The Problem - "Works on my machine"
- What is a container?
- What is Docker?
- Traditional Virtualisation v/s Docker :
- Docker Architecture :
- Dockerfile :
- Bind Mount :
- Volumes :
- Monolithic v/s Microservices Architecture :
- Installing Docker on an EC2 instance :
- Working with a Flask-Mongo Microservices Project :
- Using docker-compose.yml :
- Thank you
The Problem - "Works on my machine"
"Works on my machine" is a common phrase heard in software development when a piece of code works correctly on the developer's machine but fails to work on another machine or in a different environment. This highlights the fact that software development is often dependent on the environment in which it is executed, and differences in environments can lead to unexpected behavior.
What is a container?
Container technology is a method of virtualization that allows developers to package applications and their dependencies into isolated environments called containers. Containers are lightweight and portable, and provide a consistent runtime environment for applications, regardless of the underlying infrastructure.
What is Docker?
Docker is an open platform for developing, shipping and running applications. Docker provides the ability to package and run an application in a loosely isolated environment called a container. The isolation and security allow you to run many containers simultaneously on a given host. Containers are lightweight and contain everything needed to run the application, so you do not need to rely on what is currently installed on the host.
Traditional Virtualisation v/s Docker :
Traditional Virtualisation :

Traditional virtualization allows multiple virtual machines to run on a single physical host. Each VM runs its guest operating system, which is installed on top of a hypervisor. The hypervisor creates a virtualized hardware environment that allows each VM to access dedicated hardware resources, such as CPU, memory, storage, and network interfaces. Traditional virtualization provides complete isolation between VMs, making it more secure, but it can also be less efficient than containerization due to the overhead of running multiple guest operating systems.
Virtualisation with Docker :

Docker uses a different approach to virtualization than traditional virtual machines. Instead of virtualizing an entire operating system, Docker uses containerization technology to provide lightweight and efficient virtualization.
Hardware: The physical hardware, such as the CPU, memory, and storage, provides the underlying resources that Docker and its containers run on.
Host OS: Docker runs on top of a host operating system, such as Linux or Windows. The host OS provides the basic system services and resources that Docker needs to function, such as networking, file system access, and hardware drivers.
Docker engine: It is the core component of Docker that manages the creation, running and networking of containers. It interacts with the host OS to create a virtual environment for containers and provides a command-line interface and API for managing containers and images.
Container: A Docker container is an isolated, lightweight, and portable environment that runs an application and its dependencies. Each container has its file system, networking, and resources, and shares the same kernel as the host operating system.
Docker Architecture :

The architecture of Docker is based on a client-server model, with three main components:
The Docker daemon: The Docker daemon is a server that runs on the host machine and manages Docker objects, such as containers, images, and networks. The Docker daemon listens for requests from the Docker client and executes them.
The Docker client: The Docker client is a command-line tool or API that allows users to interact with the Docker daemon. Users can use the Docker client to build, manage, and deploy containers, images, and other Docker objects.
The Docker registry: The Docker registry is a repository for storing and sharing Docker images. Docker images are built from Dockerfiles and can be pushed to the registry for others to use.
Dockerfile :
Docker can build images automatically by reading the instructions from a Dockerfile. A Dockerfile is a text document that contains all the commands a user could call on the command line to assemble an image. The instruction is not case-sensitive. However, the convention is for them to be UPPERCASE to distinguish them from arguments more easily.
Here is an example of a Dockerfile :
# Use a base image
FROM python:3.9-slim-buster

# Set the working directory
WORKDIR /app

# Copy requirements.txt to the container
COPY requirements.txt .

# Install dependencies
RUN pip install --no-cache-dir -r requirements.txt

# Copy the rest of the application files to the container
COPY . .

# Expose a port
EXPOSE 8000

# Define the command to run when the container starts
CMD ["python", "app.py"]
Bind Mount :
A bind mount in Docker is a way to mount a directory or file from the Docker host into a container. This allows the container to access files and directories on the host system, which can be useful for sharing data between the host and container, or for providing persistent storage for a container.
Here's how to bind mounts work in Docker:
To create a bind mount, you need to specify the path of the directory or file on the host system that you want to mount, as well as the path inside the container where you want to mount it.
When you run the Docker container, you can specify the bind mount using the "-v" or "--mount" option followed by the host path and container path.
Once the container is running, any changes made to the files or directories on the host system will be reflected inside the container, and vice versa. If you want no changes to be made from the container to the file path location then use ro mode.
Volumes :
A volume is a directory on the host machine's file system that is mapped to a directory inside a container. This allows data to be easily shared and persisted between the container and the host machine. You don't know the path of the host with which the container is mapped.
Using volumes in Docker has several benefits, including:
Data persistence: Volumes allow data to be persisted beyond the lifetime of a container, ensuring that data is not lost when a container is stopped or removed.
Data sharing: Volumes can be shared between containers, making it easier to manage data that is used by multiple containers.
Backup and restore: Volumes can be backed up and restored, allowing data to be easily migrated between different environments or restored in the event of data loss.
Monolithic v/s Microservices Architecture :

Monolithic :
A monolithic architecture is a traditional approach in which all components of an application are tightly coupled and deployed as a single unit. This means that the entire application runs on a single server or a set of servers and shares a common codebase and database. Monolithic architectures are often easier to develop and test and can be more efficient in terms of resource usage.
Microservices :
Microservices architecture is an approach in which an application is broken down into smaller, independent services that communicate with each other through APIs. Each service is responsible for a specific function, such as user authentication or data storage, and can be developed, tested, and deployed independently. Microservices architectures can be more flexible, scalable, and fault-tolerant than monolithic architectures, as they allow developers to easily add or remove services as needed.
Overall, the choice between monolithic and microservices architectures depends on the specific requirements and constraints of a project. Monolithic architectures may be a good choice for small to medium-sized projects with limited resources or tight deadlines, while microservices architectures may be more appropriate for large, complex projects with demanding scalability and reliability requirements.
Installing Docker on an EC2 instance :
Create and connect to an EC2 instance
Update the package list and dependencies:
 sudo apt-get update
 sudo apt-get install apt-transport-https ca-certificates curl gnupg lsb-release
Add the Docker GPG key to your system:
curl -fsSL https://download.docker.com/linux/ubuntu/gpg | sudo gpg --dearmor -o /usr/share/keyrings/docker-archive-keyring.gpg
Add the Docker repository to your system:
echo "deb [arch=amd64 signed-by=/usr/share/keyrings/docker-archive-keyring.gpg] https://download.docker.com/linux/ubuntu $(lsb_release -cs) stable" | sudo tee /etc/apt/sources.list.d/docker.list > /dev/null
Update the package list again:
sudo apt-get update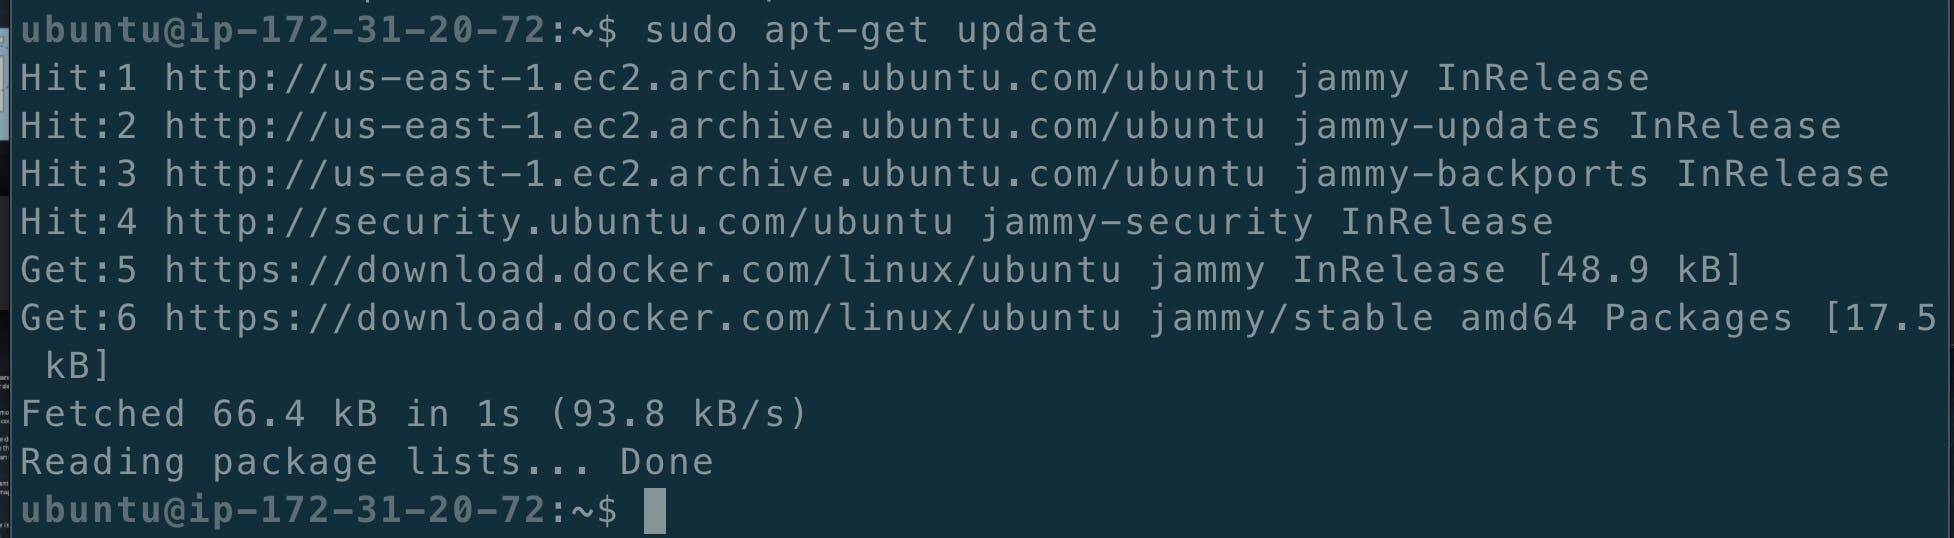
Install Docker:
sudo apt-get install docker-ce docker-ce-cli containerd.io
Add $USER to docker group :
sudo usermod -aG docker $USER
Reboot the system:
sudo rebootReconnect to the system: Example -
ssh -i "N-virginia.pem" ubuntu@ec2-52-23-24-1.compute-1.amazonaws.com
Log in to your DockerHub account:
docker login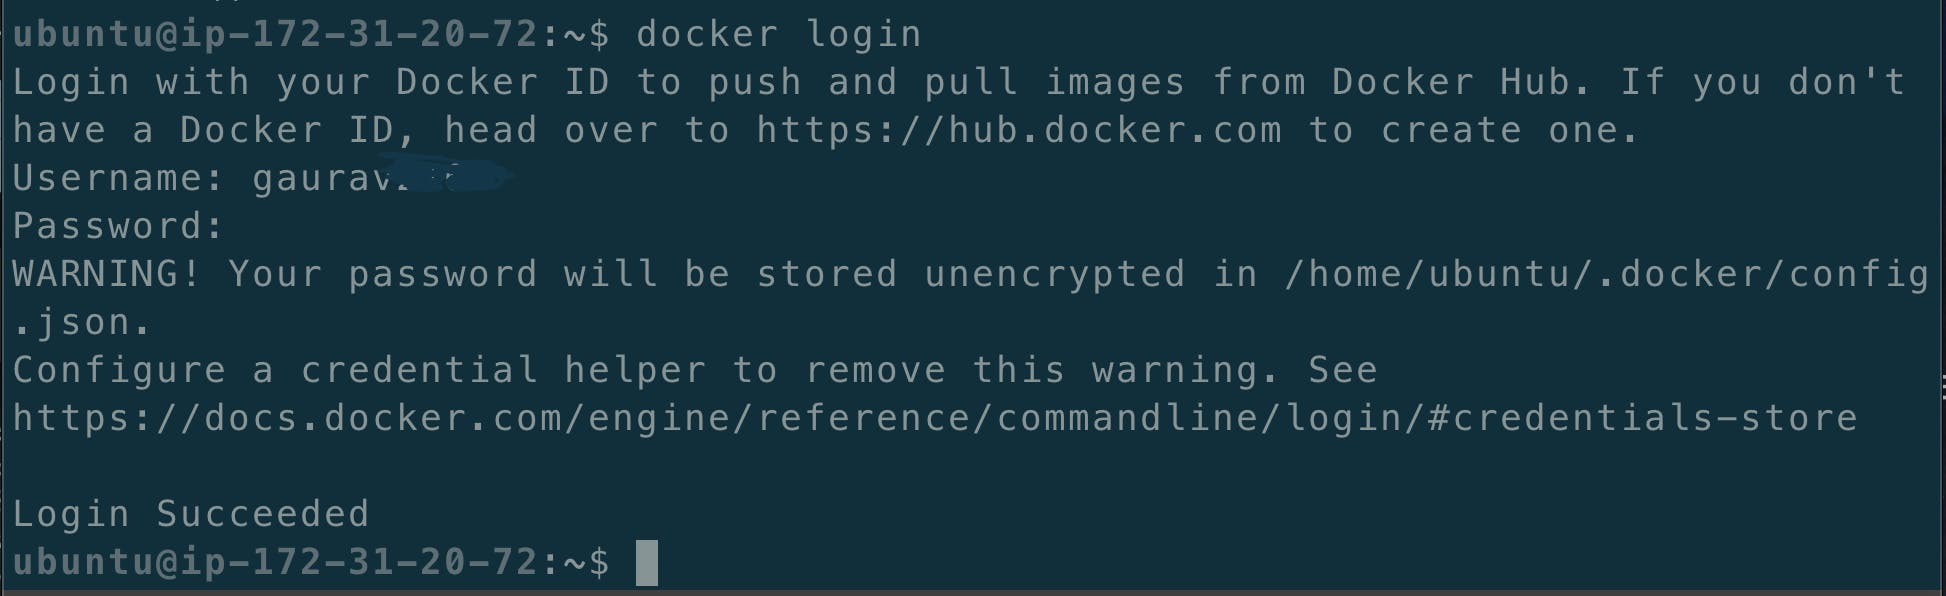
Working with a Flask-Mongo Microservices Project :
STEPS :
Clone the Repository
git clone https://github.com/GJS2162/microservices-k8s.git
Do some changes in the Dockerfile:
 1) cd microservices-k8s/
 2) cd flask-api/
 3) vi Dockerfile
 4) Press i and paste the below commands :

 FROM python:alpine3.7

 COPY . /app

 WORKDIR /app

 RUN pip install -r requirements.txt

 ENV PORT 5000

 CMD [ "python","app.py" ]

 5) Press Esc and then write :wq press Enter
Create a Network named flask-mongo-net :
docker network create flask-mongo-net
Build the image with the name "flask-api:latest"
docker build -t flask-api:latest
Write the following run command :
 docker run -d -p 5000:5000
 --network flask-mongo-net -v flask-data:/app flask-api:latest
 docker run -d -p 27017:270
 17 --network flask-mongo-net --name mongo -v mongo-data: /app mongo:latest
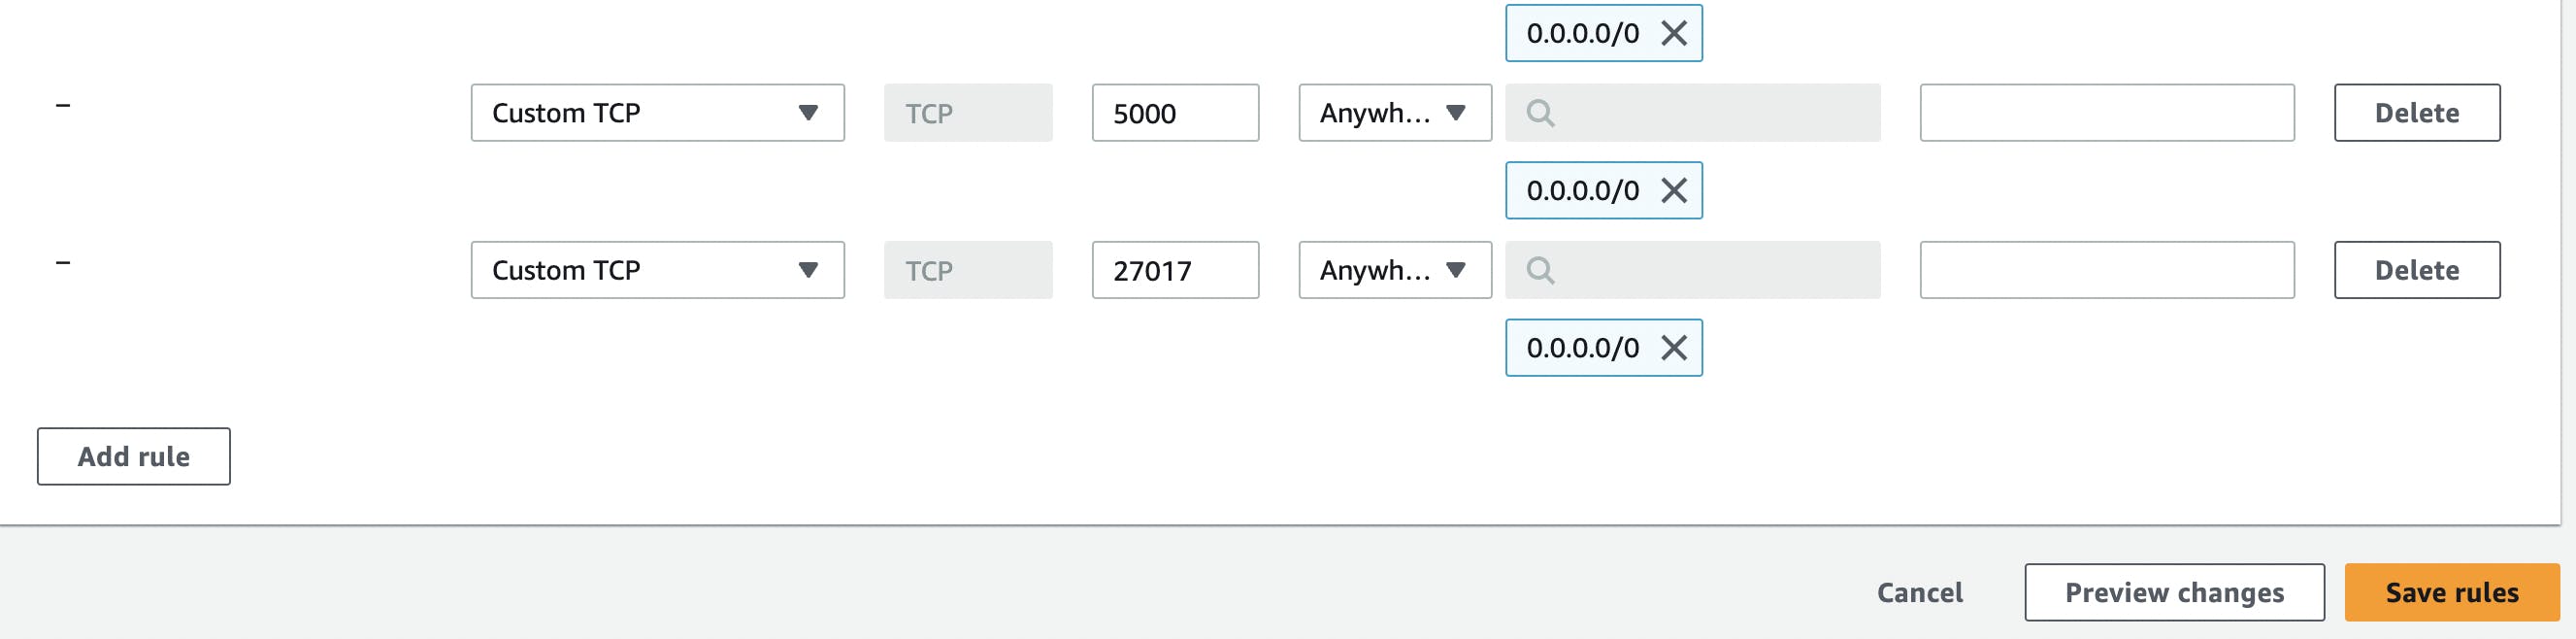
Now add two inbound rules for the instance in the Security group:
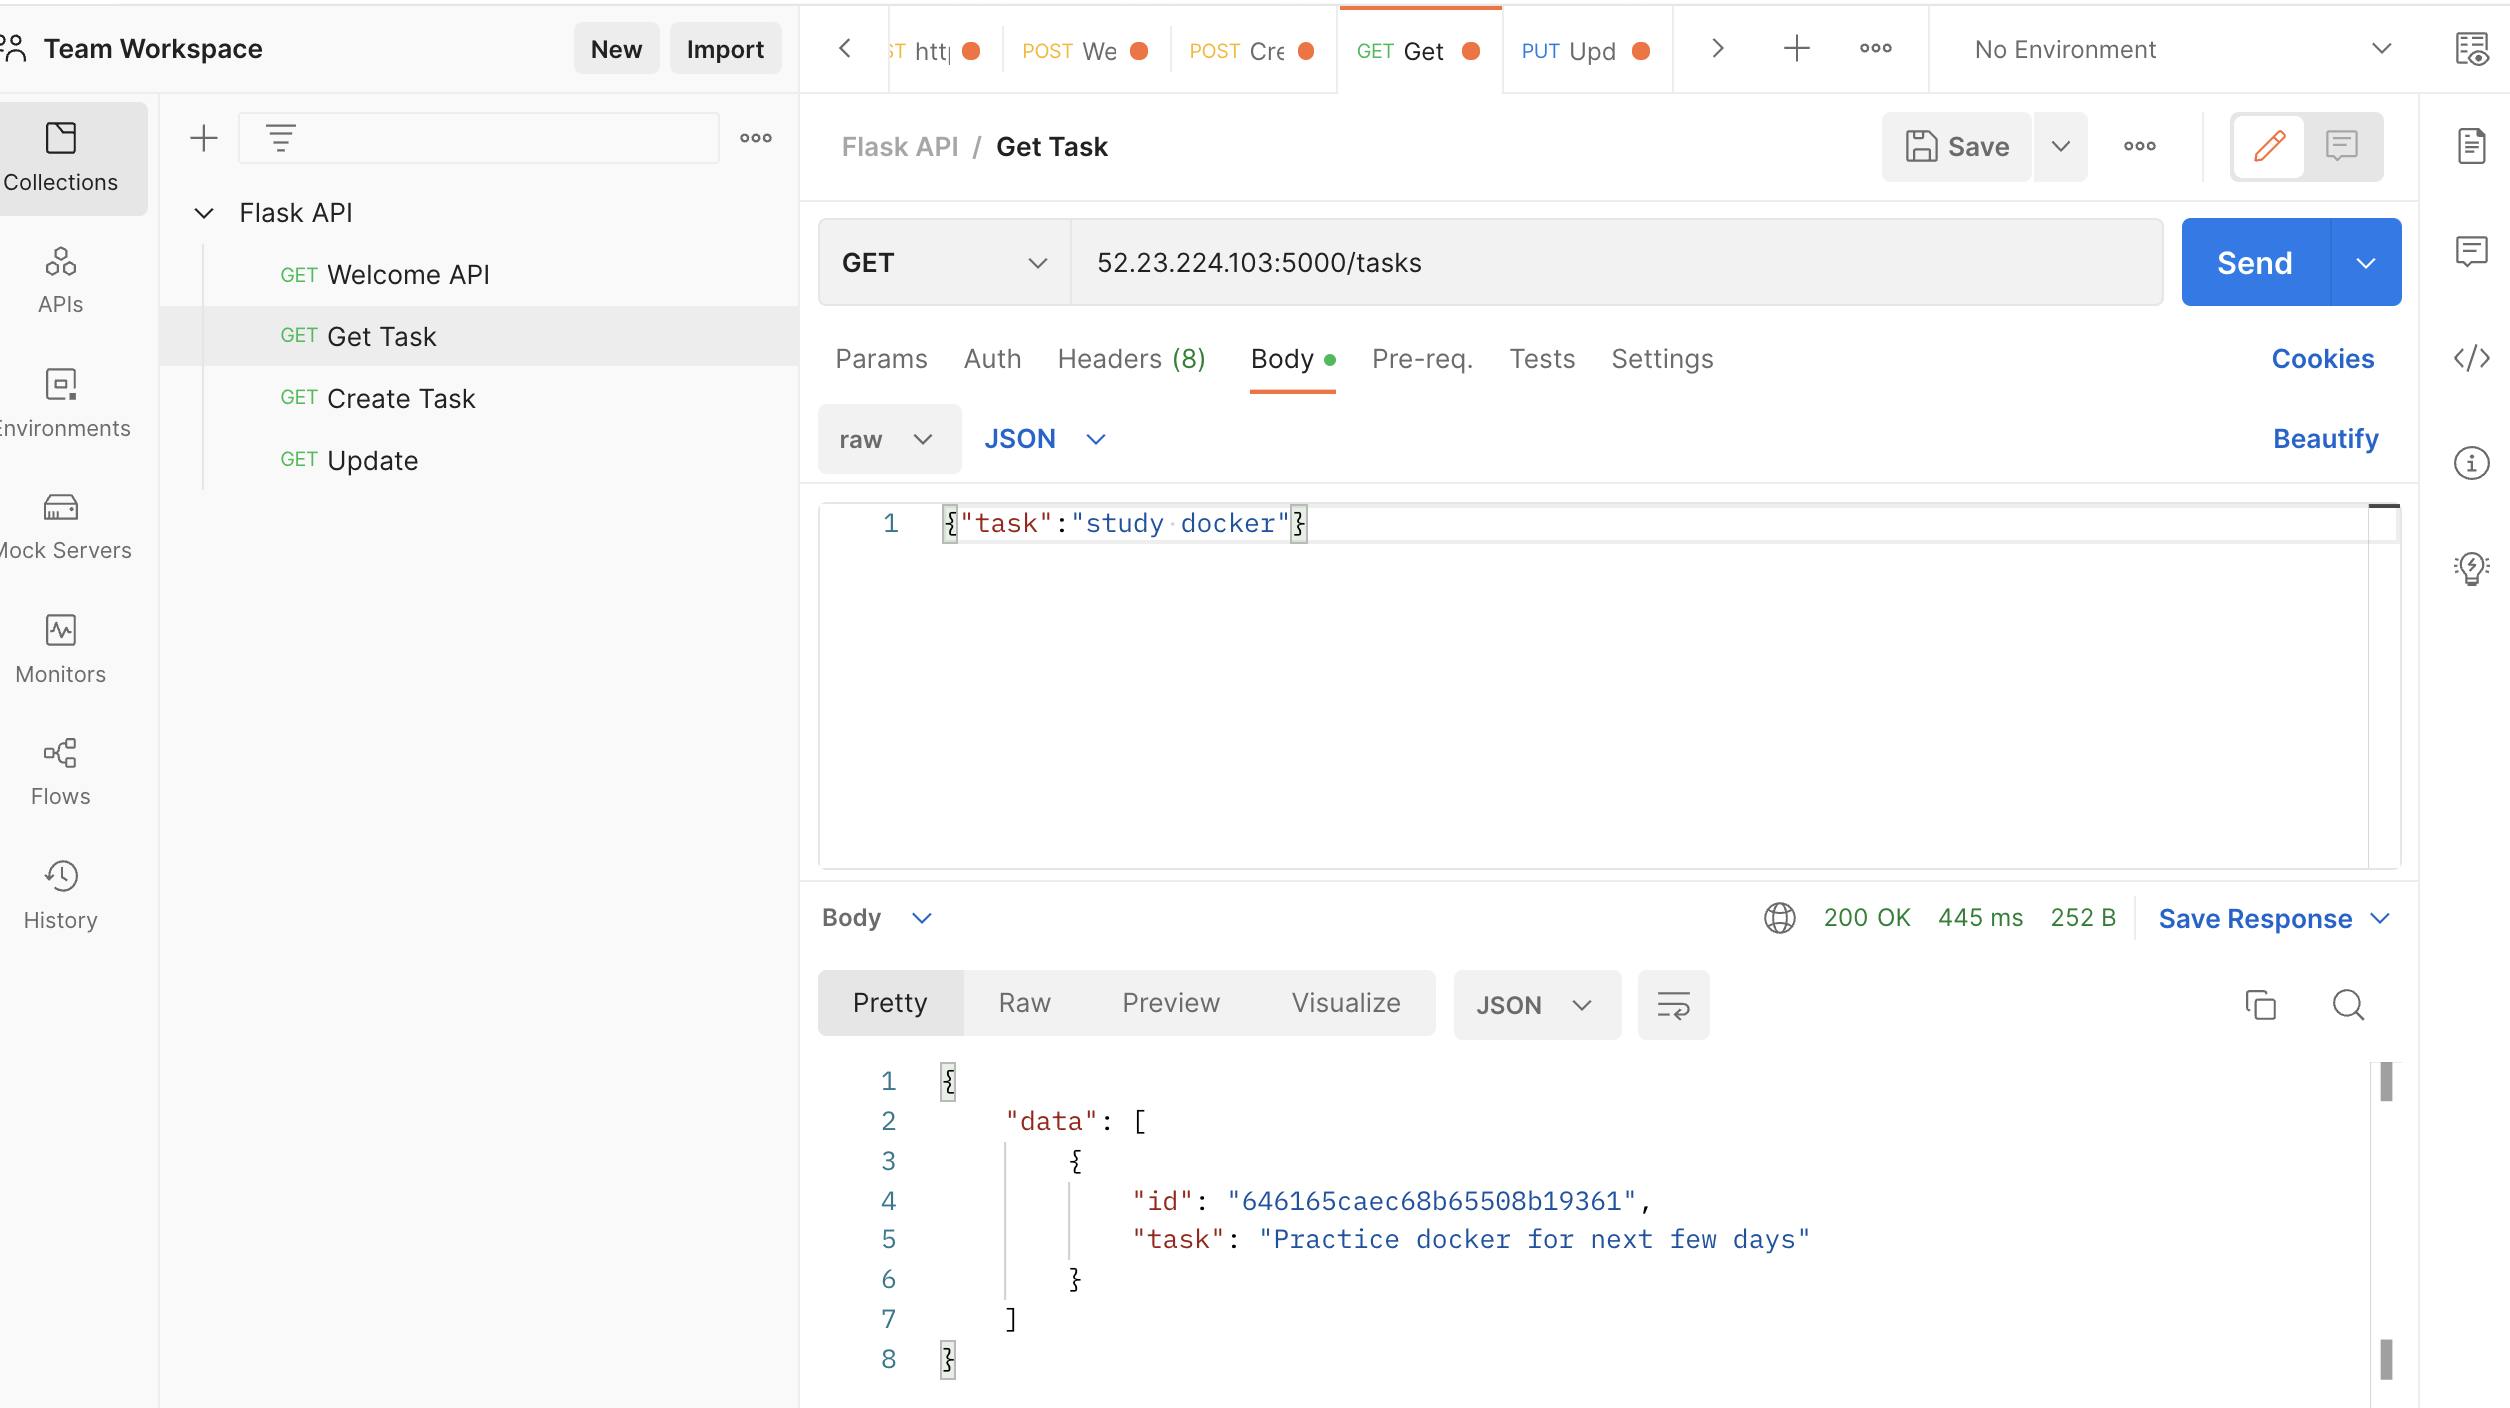
Now open Postman and create a new collection to test if everything we setup is working fine or not :
Use the public address of the instance and follow the steps.


Now go to DockerHub and create a repository :

Now rename the flask-api image to flask-micro-api:latest
A new image is created with the name provided else you could have used the docker build command again.docker tag flask-api:latest gaurav2162/flask-micro-api:latest
Now push the image to Dockerhub :
docker push gaurav2162/flask-micro-api:latest

Now kill the running containers :

Using docker-compose.yml :
Install docker-compose on EC2
sudo apt-get install docker-compose
cd /microservices-k8s/flask-api and vi docker-compose.yml and paste the following code:
 version : '3.9'
 services:
    flask-api:
      image: gaurav2162/flask-micro-api:latest
      container_name: flask-micro-api
      ports:
       - "5000:5000"
      networks:
       - flask-mongo-net
    mongo-db:
      image: mongo
      container_name: mongo
      ports:
       - "27017:27017"
      networks:
       - flask-mongo-net
 networks:
   flask-mongo-net:
     driver: bridge
Now write the following command :
Before that make sure there are no similar named containers.1) docker container prune 2) docker ps -a 3) docker-compose up -d
Check the running containers :
docker ps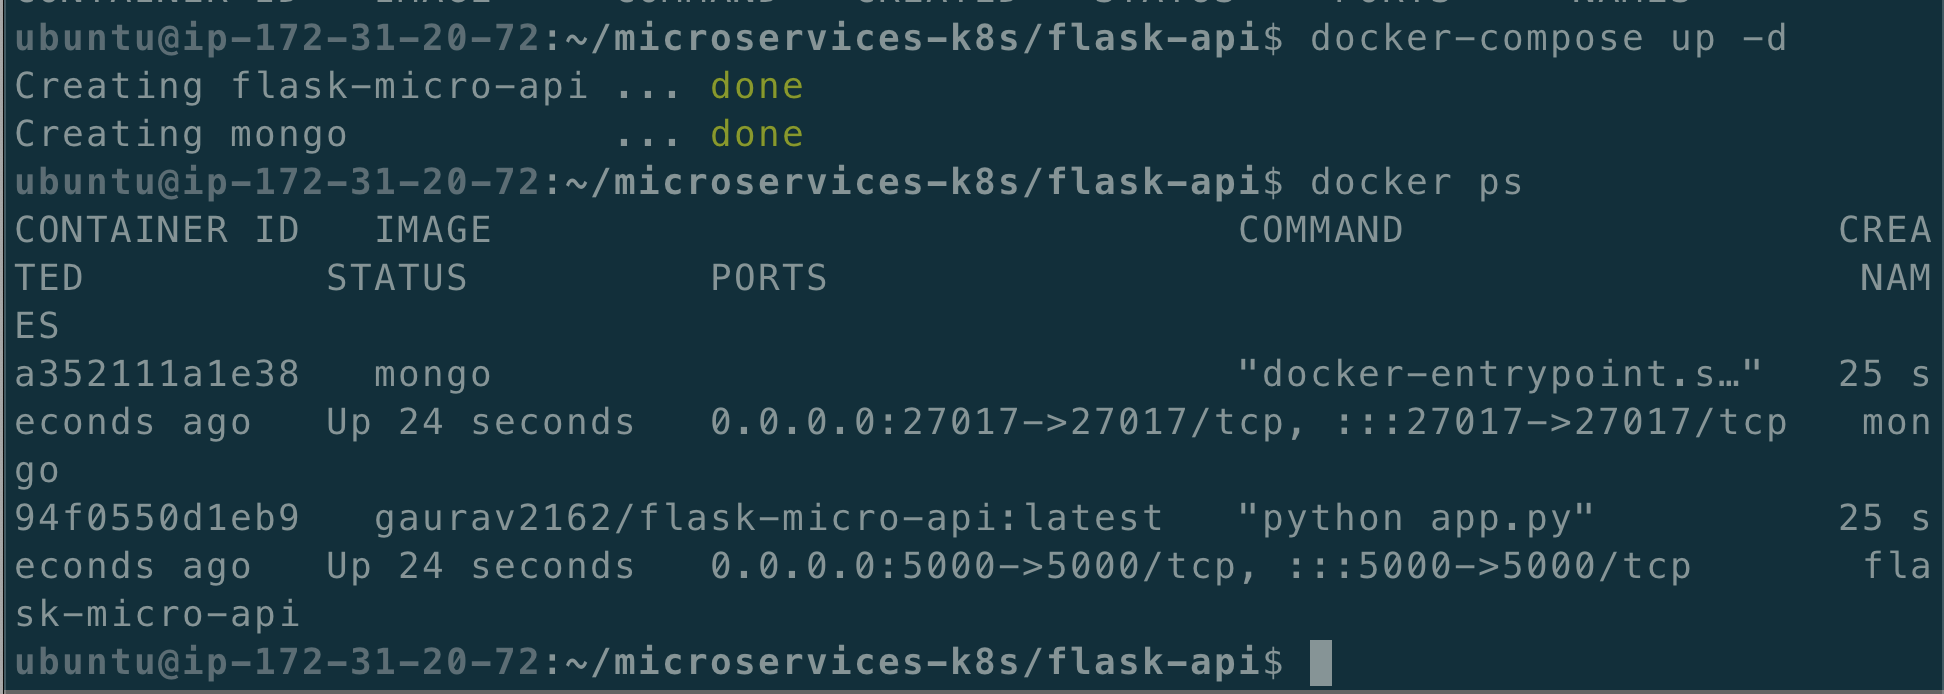
To bring down the services started using "docker-compose up -d", type:
docker-compose down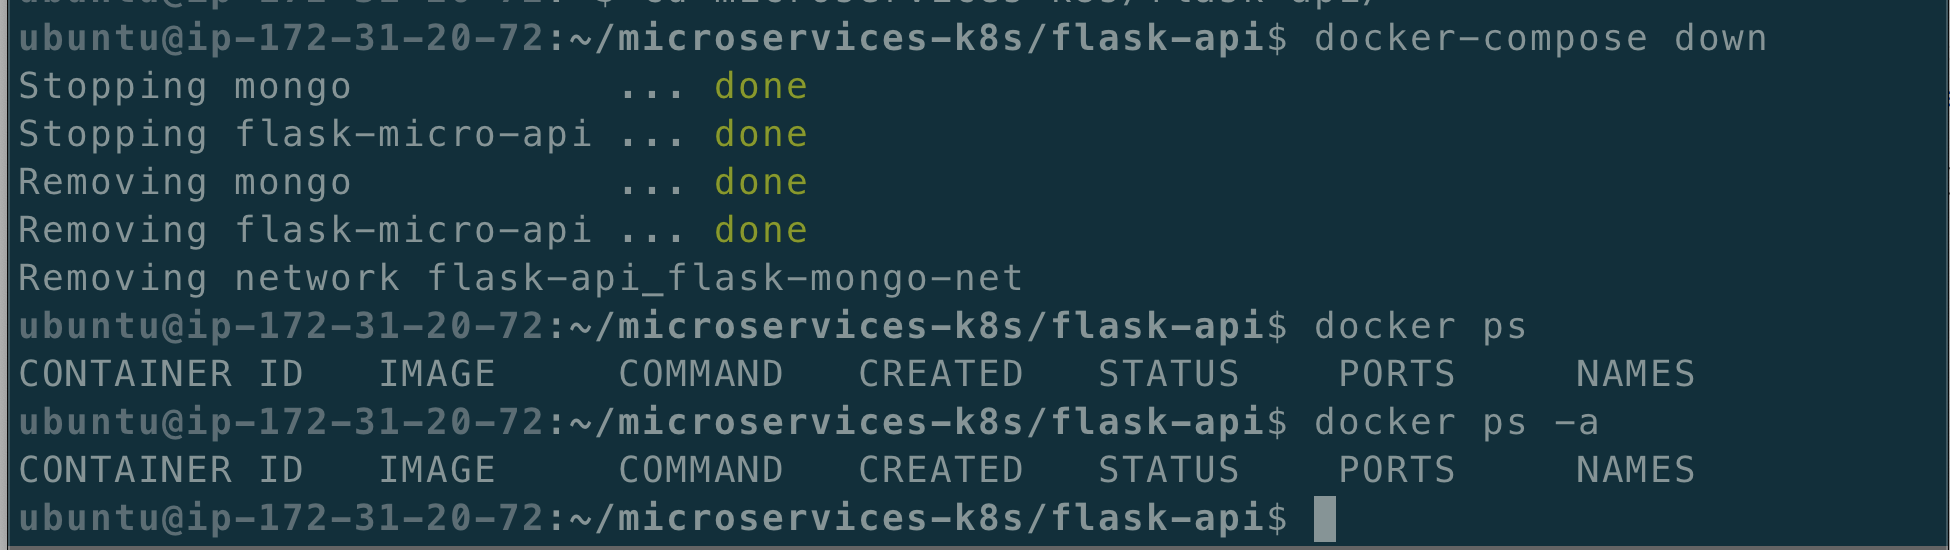
Thank you
"Thank you for taking the time to read this blog. I sincerely appreciate your effort and hope that you found something valuable within its contents. I look forward to connecting with you again in the next blog. Stay tuned for more exciting content!"