

Table of contents
- What is Infrastructure as a Code?
- What is Terraform?
- The problem before Terraform :
- Installing Terraform on Linux :
- Task 1: Create and write a text file using Terraform.
- Task 2: Create a Terraform file for running a container with the Ngnix image.
- Task 3: Create an EC2 instance using Terraform :
- Thank you :
What is Infrastructure as a Code?
Infrastructure as Code (IaC) is the practice of managing and provisioning infrastructure through code instead of manual processes. It involves creating configuration files that define your infrastructure specifications, making it easier to edit, distribute, and maintain configurations. With IaC, you can ensure consistent provisioning of environments by codifying and documenting your configuration specifications. This helps in configuration management, avoids undocumented changes, and promotes the reproducibility of infrastructure setups.
What is Terraform?
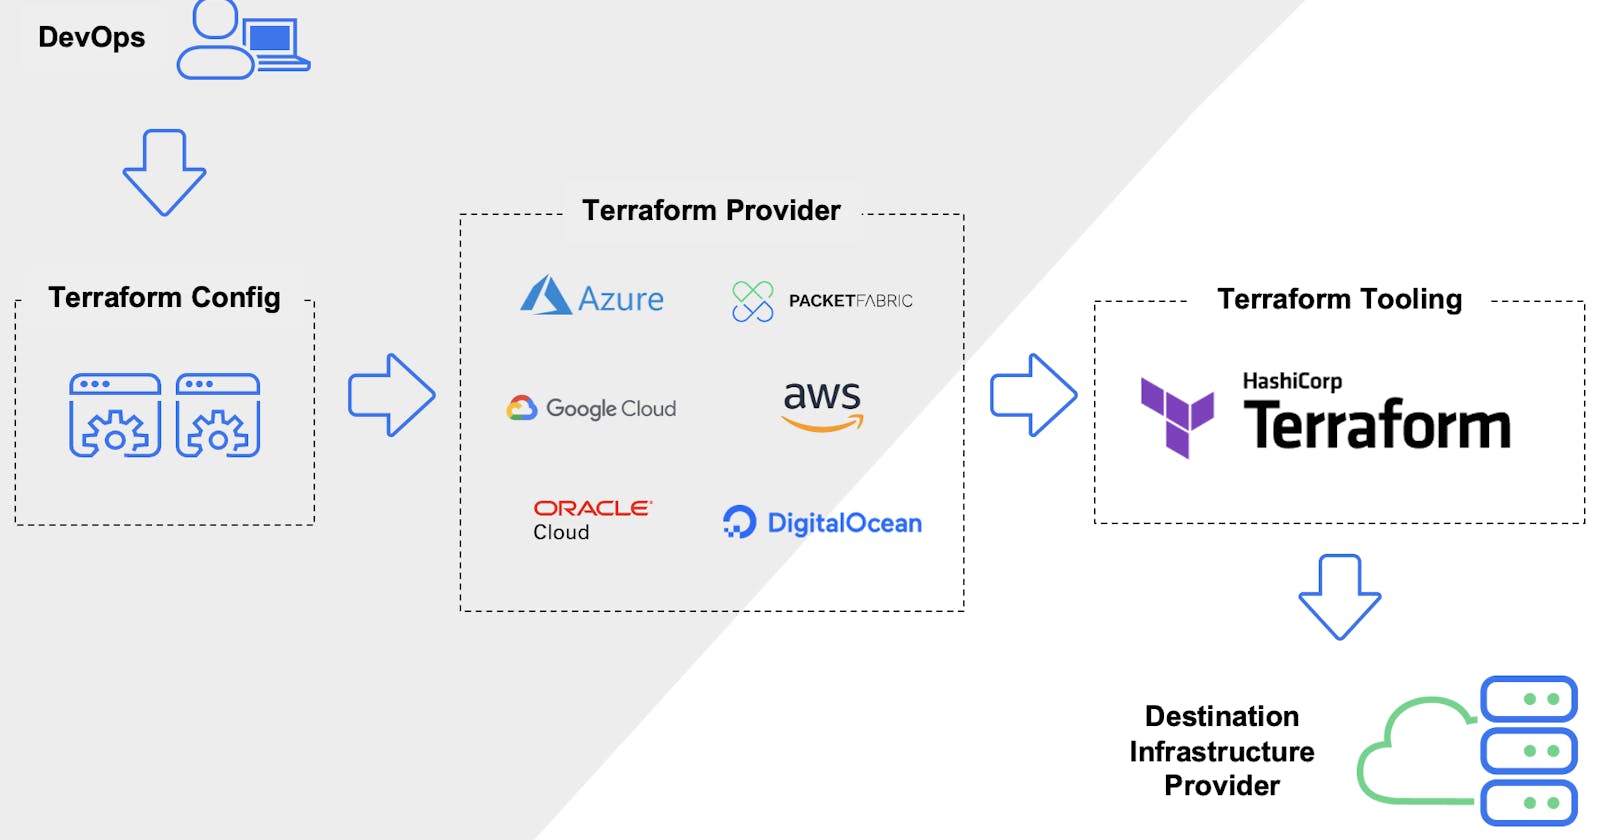
Terraform is an open-source infrastructure as a code tool developed by Hashicorp that lets you define both cloud and on-prem resources in human-readable configuration files that you can version, reuse, and share. This file contains the code written in HashiCorp Configuration Language (HCL) or JSON format that describes the desired state of your infrastructure. You can then use a consistent workflow to provision and manage all of your infrastructure throughout its lifecycle. Terraform can manage low-level components like compute, storage, and networking resources, as well as high-level components like DNS entries and SaaS features.
Terraform can manage infrastructure on multiple cloud platforms.
The human-readable configuration language helps you write infrastructure code quickly.
Terraform's state allows you to track resource changes throughout your deployments.
You can commit your configurations to version control to safely collaborate on infrastructure.
The problem before Terraform :
Before the introduction of IaC tools like Terraform:
Infrastructure provisioning was manual and prone to errors.
Version control of infrastructure configurations was challenging.
Automation was limited, leading to slower deployments.
Scaling infrastructure and collaboration between teams was difficult.
Visibility and auditing of infrastructure state were lacking.
Vendor lock-in was a concern.
Installing Terraform on Linux :
Create & connect to an EC2 instance with Linux (here ubuntu) in it.

Copy and paste the following commands:
 wget -O- https://apt.releases.hashicorp.com/gpg | sudo gpg --dearmor -o /usr/share/keyrings/hashicorp-archive-keyring.gpg
 echo "deb [signed-by=/usr/share/keyrings/hashicorp-archive-keyring.gpg] https://apt.releases.hashicorp.com $(lsb_release -cs) main" | sudo tee /etc/apt/sources.list.d/hashicorp.list
 sudo apt update && sudo apt install terraform
To check that Terraform is installed correctly, type the following command:
terraform --version
Task 1: Create and write a text file using Terraform.
Let's make a folder named creating_file and cd into it :
 mkdir creating_file
 cd creating_file
Now create a file, name it anything. Here we will name it main.tf :
vim main.tfWrite the following commands in the file:
 resource "local_file" "made_by_automation_file"{
         filename = "./demo.txt"
         content = "This file is created with the help of automation"
 }
You can refer to the below image for understanding the file

Write the following commands in sequence :
terraform init
terraform plan
terraform apply
Type yes to continue :

Now you can view the contents of the file :

Task 2: Create a Terraform file for running a container with the Ngnix image.
First, we need to install docker on our system :
 sudo apt-get update -y
 sudo apt-get install docker.io -y
 sudo chown $USER /var/run/docker.sock
 docker --version
Make a new directory name terraform_project and cd :
 mkdir terraform_project
 cd terraform_project
Make a file named docker.tf :
vim docker.tfNow search for Terraform registry on the internet :
Now type "docker" in the search bar. Select kreuzwerker/docker
Now click on the documentationNow, copy the following part of the code and paste it into docker.tf:terraform { required_providers { docker = { source = "kreuzwerker/docker" version = "3.0.2" } } }Now add the following code of the image and container below it :
resource "docker_image" "my_nginx_image"{ name = "nginx:latest" keep_locally = false } resource "docker_container" "nginx_conatiner"{ image = docker_image.my_nginx_image.name name = "nginx-tf" }The final file will look like this:
terraform { required_providers { docker = { source = "kreuzwerker/docker" version = "3.0.2" } } } resource "docker_image" "my_nginx_image"{ name = "nginx:latest" keep_locally = false } resource "docker_container" "nginx_conatiner"{ image = docker_image.my_nginx_image.name name = "nginx-tf" }The above code can be understood in the following lines:
The
terraformblock declares the required providers and specifies that we need thedockerprovider fromkreuzwerker/dockerversion3.0.2.The
docker_imageresource with the namemy_nginx_imageis defined. It represents a Docker image and uses thenginx:latestimage from Docker Hub. Thekeep_locallyattribute is set tofalse, indicating that the image should not be kept locally after running the container.The
docker_containerresource namednginx_containeris created. It defines a Docker container based on themy_nginx_image. Theimageattribute references thenameattribute of thedocker_imageresource. Thenameattribute specifies the name of the container, which is set to "nginx-tf".
Now write the following commands one by one :
 terraform init
 terraform plan
 terraform apply
Now to check the resources created :
terraform state list
Now, to see whether the containers are running or not type :
docker ps
We declared that we don't want to keep the image locally, let's check that :
First, we will destroy the resources we created :
terraform destroy

Now, let's see that is the image present locally or removed:
docker images
Task 3: Create an EC2 instance using Terraform :
Let's make a new directory named server and cd into it :
 mkdir server
 cd server
Create a file named terraform.tf :
vim terraform.tf
Go to the Terraform Registry and search for aws and select hashicorp/aws and copy & paste the terraform part from the documentation:
 terraform {
   required_providers {
     aws = {
       source  = "hashicorp/aws"
       version = "~> 4.0"
     }
   }
 }
Create providers.tf file and copy the code for configuring the AWS Provider into it :
You can write the region accordingly. I love us-east-1
 provider "aws" {
   region = "us-east-1"
 }
Create a file called aws.tf and write the following code in it :

 resource "aws_instance" "my_instance" {
         ami = "ami-053b0d53c279acc90"
         instance_type = "t2.micro"
         tags = {
         Name = "Terra-created"
 }
 }
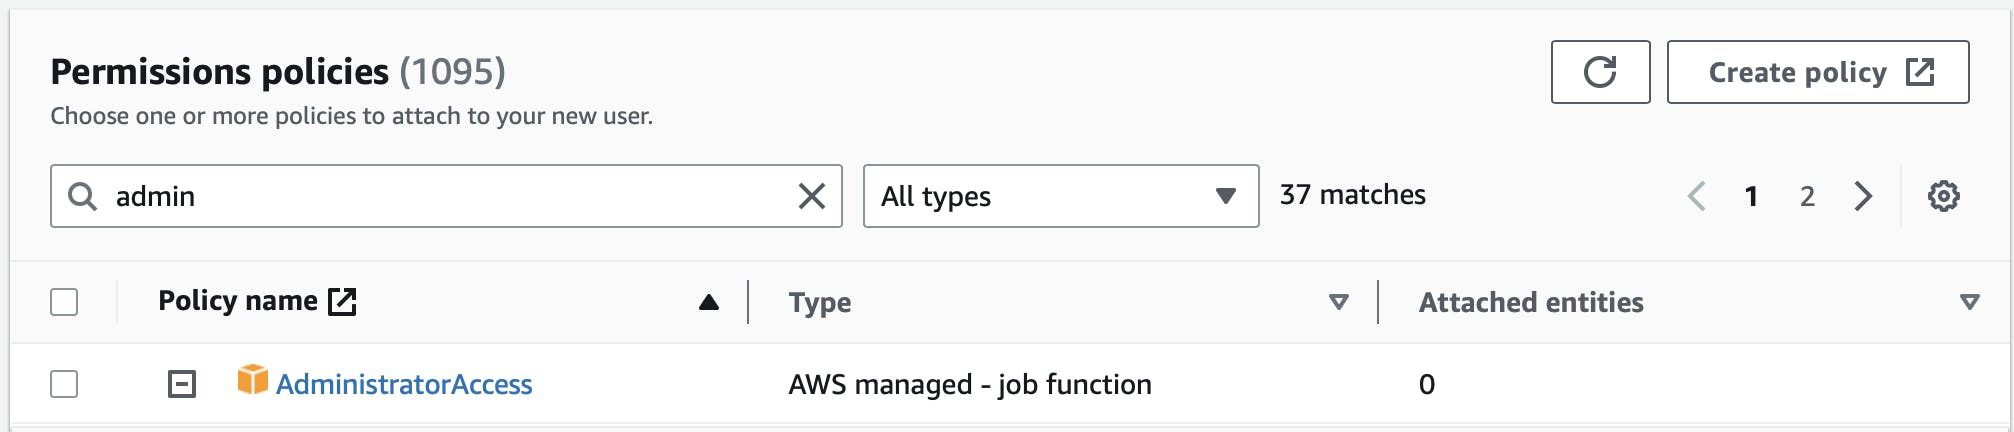
Now create a user on AWS using IAM and copy the Secret key and Access key somewhere :
Follow the Steps :1) Go to IAM and click on Add Users

2) Give the user a name

3) Attach a policy, here; Administrator Access
4) Click on the created user and go to the security

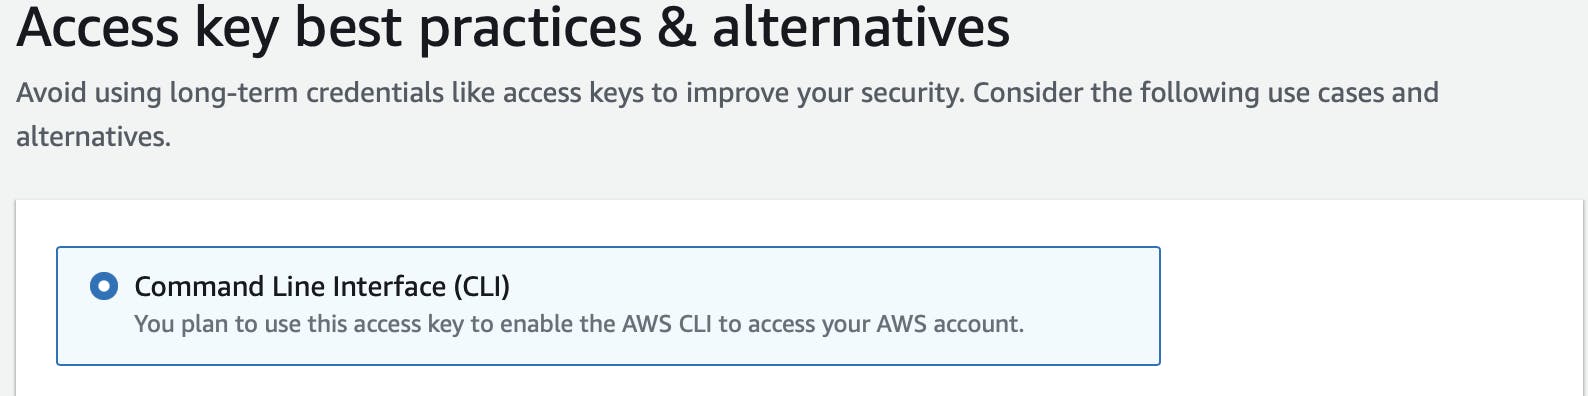
5) Go to Access Keys and click on "Create access key"

6) Select CLI
7) Give a tag if you want (optional)

8) Now copy the keys somewhere safe, you won't be able to see them again

Now install aws cli on your machine :
sudo apt-get install awscli
Now configure aws cli :
aws configure
Now write the init command :
terraform init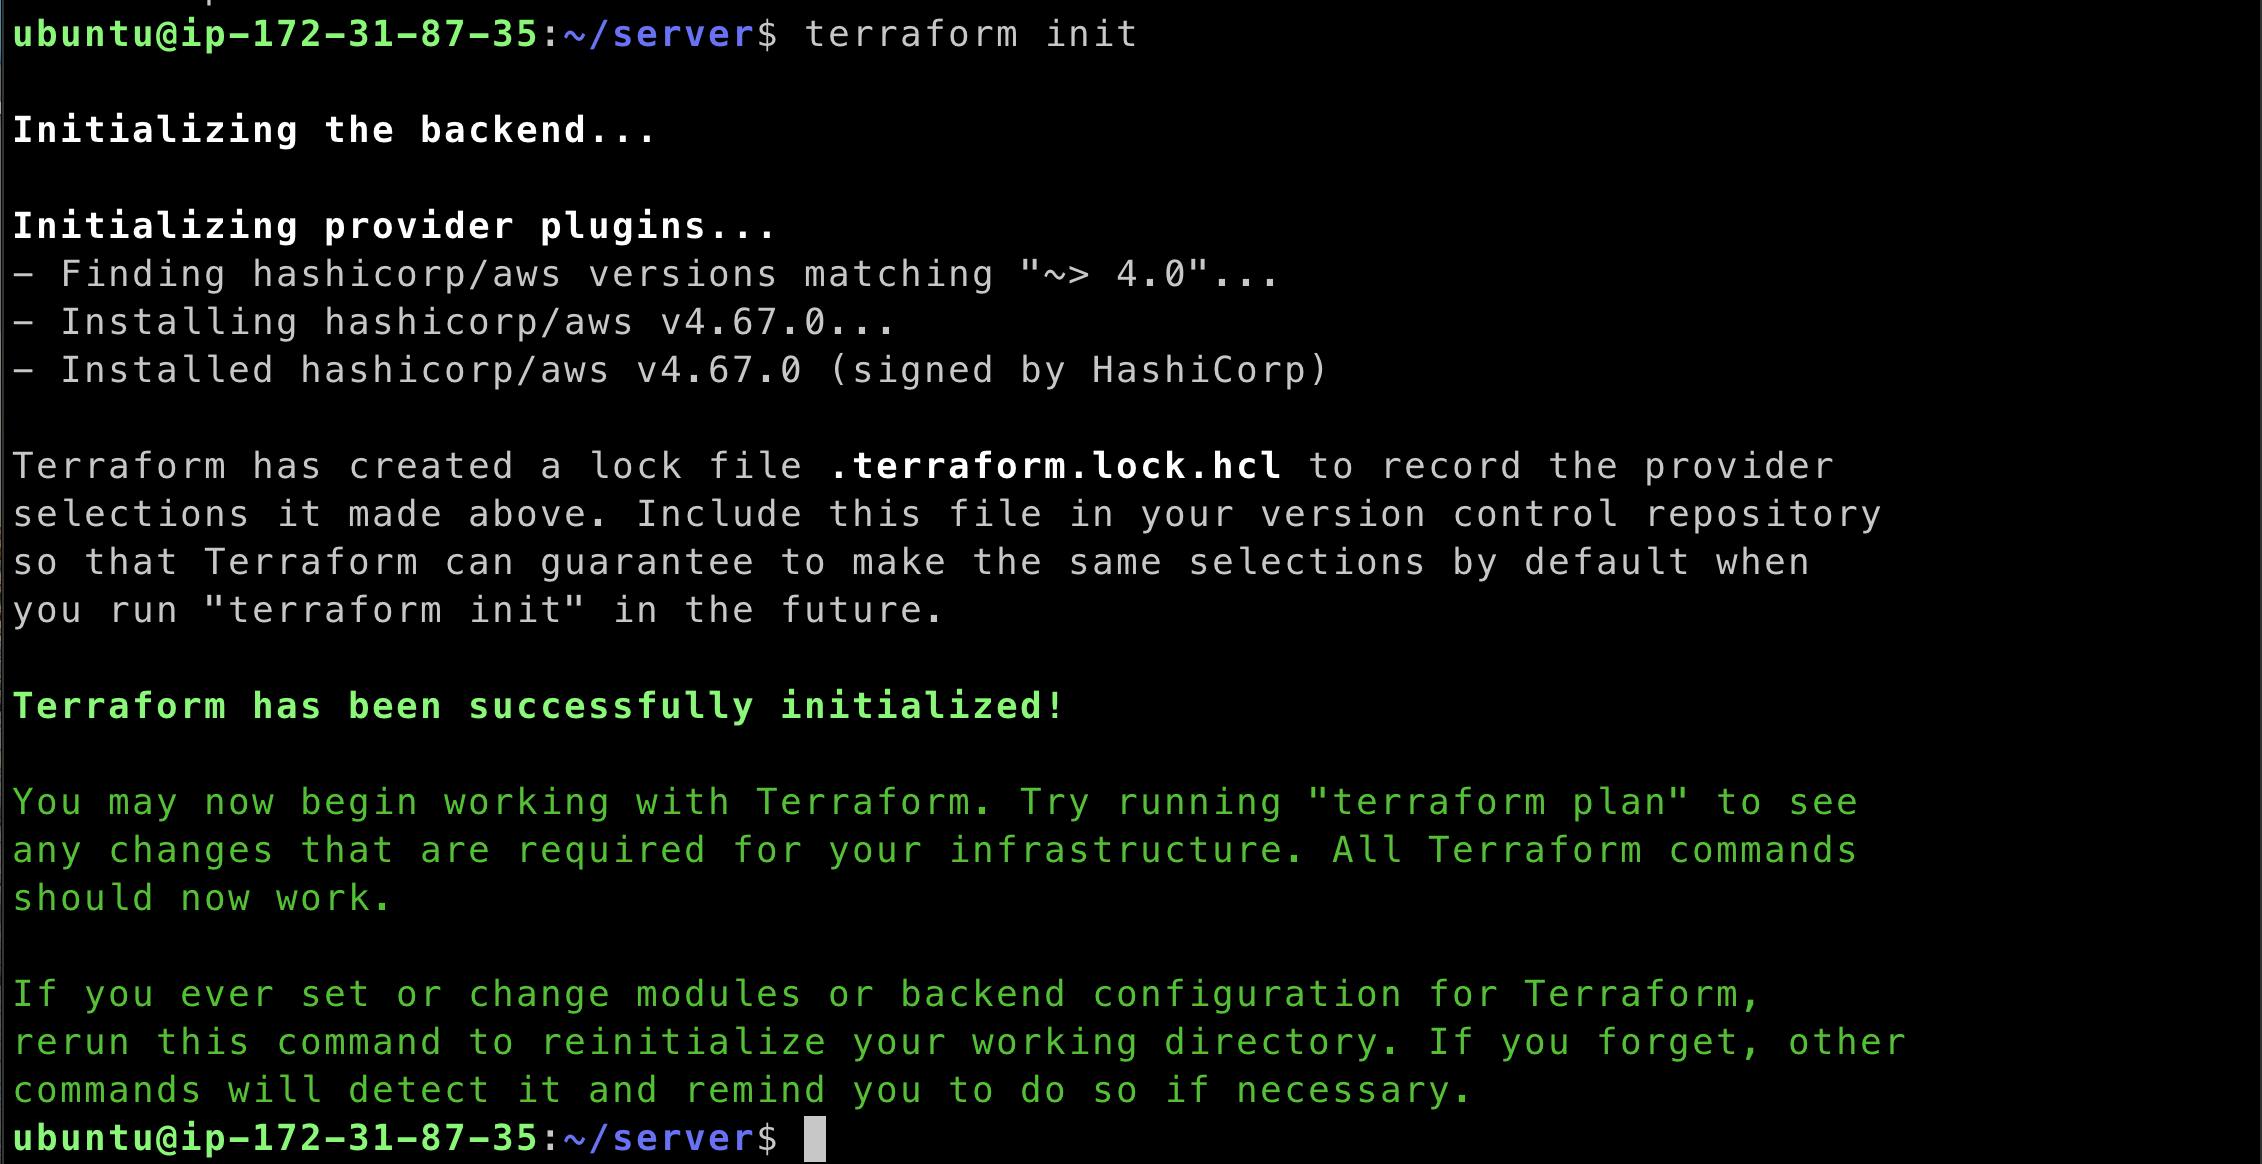
Now write the plan command :
terraform plan
Now let's see the magic :
terraform apply

Go to the AWS console and check in the EC2n instances for Terra-created :

Let's destroy the resources :
terraform state list
terraform destroy -target=<resource name here: aws_instance.my_instance>


Thank you :
Dear readers,
I want to express my heartfelt gratitude for your continuous support and engagement with my blog. Your readership and valuable feedback have been instrumental in shaping the content and direction of my writing. Thank you for being a part of this journey and for inspiring me to keep sharing my thoughts and ideas. Your presence means the world to me, and I am truly grateful for your unwavering support.
Warmest regards, Gaurav Ji Srivastava